
Modifying my El Cheapo Smoker for better results!!
Back in 2015 I purchased a Banquet Savannah stacker smoker from Amazon for £34.99. Lovingly nicknamed the "El Cheapo" its a popular choice for beginner BBQ enthusiasts that doesn't break the bank,
I was giddy with excitement and eager to get stuck in and create my very own "American Barbecue", The new fad that was sweeping through the UK like wildfire!
Unfortunately I quickly found out that it doesn't work very well!!
Read on to discover how I tinkered with it enabling me to impress family and friends with mouth watering barbecued meat, crowning me King of outdoor cooking and eventually inspiring me to create my very own range of travel smokers - The BeardSmoke Mini-Un....
First Attempt...
My first ever shiny new barbecue smoker takes up its new residence in the corner of my garden, my first thoughts of it were "Flimsy"..

I quickly overloaded it up with cheap supermarket briquettes and wrapped some cheap pork leg in foil to make pulled pork ( Don't Do This, Ever!!)
I at least had the knowledge to use a chimney starter and have an electronic temp gauge on standby! I also covered the water pan in foil as I'd read this made cleaning easier!
The smoker leaked smoke from everywhere but this settled, we were away!

With there being an air gap around the firebox there was no way of regulating the intake so the vent on top is a bit useless, The temps soared!!
After filling the waterpan with cold water the temp came down to around 250f for a couple of hours. I thought I had cracked it but the cheap briquettes quickly burned away.
As the temp dipped to around 215f I opened the door to add more unlit coals this plummeted it further to 180f!
30 minutes later it had managed its way back to 250f and then slowly dropped again back to 200f, I spent the next 5 hours repeating this over and over again, Chasing the temps in between beers, This was going to be a long day...

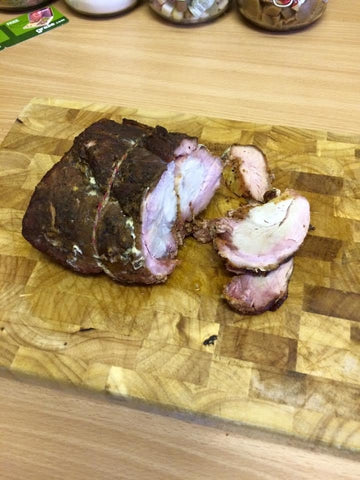
Eventually the internal temp of the meat hit 195f, After 7 hours I was getting fed up of waiting. I'd also eaten a full Beef Sunday dinner, drank severel beers and a bottle of red so wasn't very peckish anymore!
I nervously tried a couple of test slices..
It was tough, chewy, bland and tasted like it had been cooked over the exhaust of an old fork lift truck...
I filed it into the bin, put the day down as a learning curve and went to bed with the face on!!
A New Day...
Obviously yesterdays disaster didn't fit with my dreams of becoming Yorkshires own Pit-Master, something needed to be done!!
Being the tinkerer I am I looked into the first most obvious problem, Temp Control...
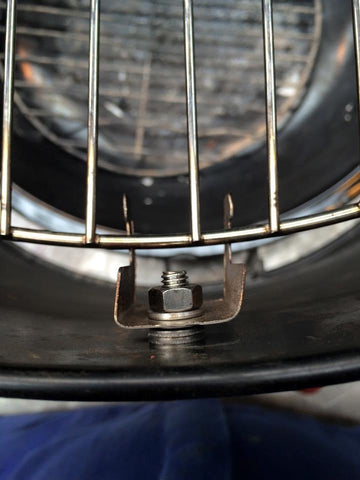
Having an open gap around the fuel gives no way of regulating the airflow, you need to be able to control the flow of air to the coals, more air = higher temp and vice-versa , The gap needed to go...
Searching the scrap bin at work I found an old stainless gasket ring that fit absolutely perfectly around the fire bowl, The sausage gods were shining upon us!!

A stainless strip was the next to be tacked on to create a seal...

Next I fab'd up a frying pan type bottom vent and drilled through the fire bowl to enable air adjustment...

I knocked up 3 screw-on legs that the body would now sit on, The weight of the smoker would provide a seal but I could always add a high temp gasket later...

Next i switched the standard legs to the outside with a spacer, the smoker body would only sit on these when the top was removed from the fire bowl to refuel etc...

I removed the grill clips and added spacers as with the flimsiness and flex of the thin smoker caused the grill and water pan to fall out whenever it was moved...
I bent the doors to seal better and knocked up some beefed up door latches to replace the Christmas cracker ones supplied...

A sturdy coal grate was required to lift the fuel and create a gap underneath, allowing the ash to fall through instead of choking the coals out, And also help with airflow...

A couple of 6mm holes were drilled just above the grill heights to feed in the temp probes...

Last but not least I filled the water pan up with lava rock as it was on offer at the Supermarket, I covered it in foil to catch any juices which makes cleaning easier.
I found that water in the water pan just evaporated, and fluctuated the temperature inside the smoker, You don't need water in to moisture the cook as spraying the meat with a spritz does the job a lot better.
What this smoker really needs being so thin and sensitive to fluctuations is a heat sync, This allows a mass to absorb and hold some heat so if the coals suddenly lost temp or went out the inside temp would hold steady and not plummet, This would smooth out large fluctuations helping to control the cook.
Lava rock, sand, a clay dish or even a brick wrapped in foil are all heat syncs I've seen and will all work!
With this in mind and armed with my new and improved, modified and adapted El Cheapo budget smoker I tried my first Beer can Chicken complete with rub from Lidl!!

It came out very nice!! Smoker held temps steady at 250f ish for 3 hours and the taste wasn't disgusting!!

I quickly moved onto ribs..;

Tandoori Chicken..

And beef short ribs!!


The Journey begins...
I was now well and truly hooked on my pitmaster journey!
I had a long way to go in learning.
Fuels, Woods, Flavours, Rubs, Spritzes, Sauces, Meats and Techniques were all things I were looking forward to discovering, And even now 6 years on I have only just scratched the surface, still classing myself totally as a beginner but absolutely loving learning from the greats and cooking for family and friends...
It didn't take me very long to come up with a list of things to fix on my newly modified and improved El Cheapo budget smoker, It had seen me well but my Tinkerer finger were itching and I had to build something better and easier to use...
BeardSmoke MK1 Prototype...
I now needed a Smoker that didn't leak, that was sturdier and more efficient in fuel use, so i decided to study the pit calcs and build one...

Welcome the Mark 1!!
Outdoor cooking was now almost set and forget, Load up the basket with charcoal, sprinkle of wood chips, drop in the meat and away you go!
The vents didn't need messing with and the smoker lost little heat so it was very efficient and used very little lumpwood for a long, low n slow cook.
The Pork pulled a lot better too!!
Saturday mornings now consisted of me sticking meat on like this...

Until it looked like this...

And pulled like this...
Bye bye to Fork Truck Pork!!!!

Camping Smoker...
Camping and walking was a regular activity on our weekend list, It was only a matter of time before the smoker made an appearance with us.

Campsite food suddenly got better...
We could load the smoker up in the morning then take of for a few hours walk and a couple of pints at a country pub, On arriving back at the campsite we were greeted with the amazing smell of roast pork and beef brisket!
Gone were the disposable sausage burners and Pot Noodles, BeardSmoke was in town!!

This meat was maybe a tad dry but we were the envy of the campsite, It soon got shared around and at least we had plenty of cheap cider n lager to wash it down with!!!

Now if only I could make something a bit smaller that worked as good but fit in the boot of the car a bit better.....
Introducing -
The BeardSmoke Mini-Un, Original and Deluxe travel Smokers!!!
Seemingly a thousand prototypes, experiments, calculations and failed cooks later I was awarded with these Beasts..

Small enough to fit in the boot of a Mini Cooper but mighty enough to tick over low n slow for 10+ hours on one load of lumpwood charcoal...

Sturdy enough to hit +450c and sear steaks to perfection whilst hot n fast grilling...

Versatile enough for one-pot rice dishes, Chillis and stews...

And...
With Rotisserie, Plancha and Pizza steel attachments currently in development stage but coming soon!!


Thank you for reading, Please check us out and contact me for more info!!
Nick@BeardSmoke...
Very interesting and informative for a newbie like me.
I’ll make a few tin foil adjustments around the charcoal bowl of my own El Cheapo to stem the airflow, and add sand to the water bowl. See how I get on.
I plan on upgrading next year…. Once I’ve learnt the hard way!!